


Purpose
The comment() is used to add annotations or notes directly on an SAP screen. This command is commonly used to provide information about the script’s purpose, actions to be performed, or required user inputs. You can position the comment anywhere on the screen. It can be used in displaying quick info text, brief instructions, or field-specific explanations. The comment appears in blue on the screen.
Syntax
You can define comments using different formats based on how and where you want the text to appear:
Format 1: Basic comment placement
Displays a comment with a text label at a specific row and column.
// Creates a comment at specified row and column coordinates
comment([row,col],"text");
Format 2: Displays comment at specified row and column
Displays a comment with an underline at the specified row and column on the screen.
comment([row,col],"text",{"left":true});
Use the left option to underline the comment text.
Format 3: Displays comment relative to screen element
Displays a comment with respect to the other screen elements.
comment("F[screen element]+[row,col]","text");
Properties
- row, col - Coordinates that define row and column.
- text - The content of the comment.
- screen element - The target field name
Available Options
Left is the only option used with the comment().
|
"left":true - The left option adds an underline to the comment text, extending to the nearest input control or dropdownlist situated to the right of the text. |
Option Detail

Example 1:
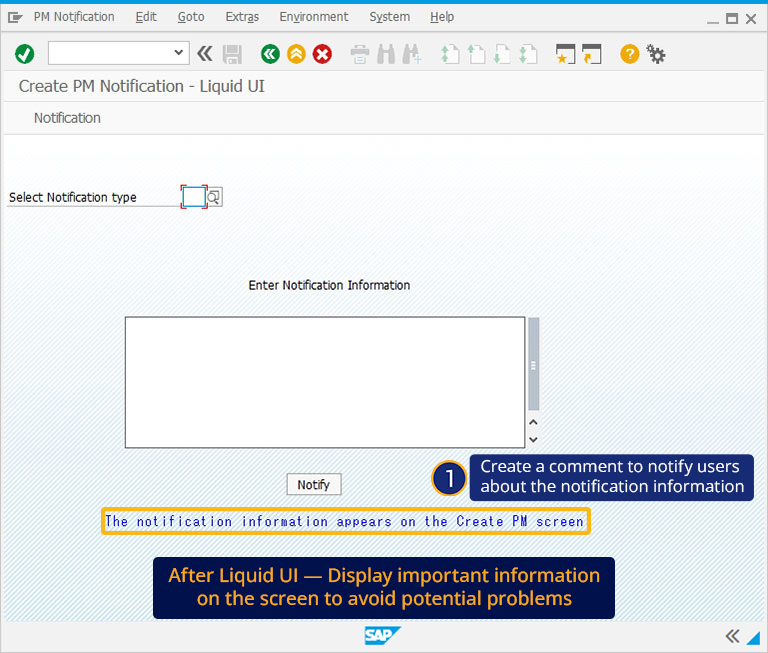
The usage of comment() is demonstrated on a customized IW21( Create PM Notification-Liquid UI) screen, in which the comment notification information appears on the Create PM screen, notifying the user about the notification.
// Creates a comment to notify users
comment([20,12],"The notification information appears on the Create PM screen");
Click here for details on how to add a comment on the screen.
Example 2:
The following example demonstrates how to create a comment with respect to other screen elements on the VA02 screen. Here, we created a comment to notify the user to enter the Sold-To Party and Ship-To-Party details before further processing.
// Creates a comment to notify about specifying the required details
comment("F[Sold- To Party]+[0,30]", "Please enter Sold-to party and Ship-to Party details",{"left":true});